Artwork
Print file set-up checklist
Please make sure that your artwork matches the specifications you entered in our price calculator before clicking ‘Add to Basket’. Common errors include having the correct number of pages, whether your page count is a multiple of 4, and whether your page designs are both the correct size and consistent throughout.
If you’re using a program like InDesign, the software takes care of size consistency for you. If you are compiling your book from a variety of different files and sources, then there may be some inconsistencies.
If you are getting your book perfect bound, you will need to design a spine or include additional space in the cover artwork. You can either use the spine measurement generated in the Artwork Dashboard.
For best results, make sure your document has the correct amount of bleed outside of the page edge and that there are no important parts of your design within the quiet area.
We recommend adding a 3mm bleed area to the outside of your pages. Make sure all design elements that you want to extend all the way to the edge of the page actually extend into the bleed area. This includes all images and coloured backgrounds.
Keep all important design elements 5mm away from the page edge. We call this the quiet area. Doing this helps to prevent text and important images from being placed too close to the edge of the page or being difficult to see because of the fold of your booklet.
What looks good on the web doesn’t always look good in print. This is due to low image resolution. For the best results, we recommend that all images and print files have an image resolution of 300 dpi.
While you can use images of a lower resolution, they can look pixelated when printed.
But bigger isn’t always better, either. While you can use images of a far higher resolution, anything beyond 400 dpi will not improve the image print quality and will slow down the process instead.
If you have chosen to use a special finish (such as a Spot UV effect) on the cover of your book, please make sure that this extra layer has been applied to your print file. This can be quite tricky to set up, so please read our guides on speciality finishes.
While our system automatically and intelligently converts RGB colour to CMYK for printing, this can cause a colour shift. This is why we recommend that you use a design program to change the colour mode of your artwork from RGB to CMYK and then fine tune the CMYK values until you’re happy with them.
You can also set your design program to a CMYK colour mode before you begin to create your artwork.
If you’re just starting to create your artwork, this is what we recommend.
Ink saturation can also affect the final look of your print job. Should you be printing in rich black or standard black for black and white projects? We know this aspect of printing can be challenging and overwhelming.
Fortunately, we have a number of guides to help you get your colours perfect for printing, and our print experts are always available to answer any questions you have.
Uploading your print-ready files to Consort Media is easy. While we prefer high-resolution PDFs, our system will accept a wide range of file types. But please be aware that there are potential colour and resolution issues associated with other file types.
We recommend submitting the pages to be printed in the form of a single 300dpi high resolution PDF file. However, if you prefer, you can also upload a separate file for each page in your project.
If your artwork is set up as double-page spreads, our system is smart enough to divide these pages up and treat them separately.
Print file setup guide
Learn how to make print ready PDFs with our easy print file setup guide. It includes information on interior pages, covers, double spreads, and links to our handy library of templates.
This quick and easy print file setup guide explains how to make your PDF designs ready for printing.
If you would like to know more about why these requirements are needed, click on the links in each section for more detailed information.
Before you begin, please ensure that you are using the correct size, that your images are 300 dpi, that you are using CMYK colours for printing, and that you’ve remembered to add bleed to your designs. If in doubt, always follow our checklist before submitting your print file.
When setting up the interior pages for a book or brochure, always think about how the final product will be printed and design your pages accordingly. Here is our step-by-step guide to setting up your internal pages for a multi-page book or brochure.
1. Choose between single or double-page spreads
If you are using Adobe InDesign, your document will automatically be set up as double page spreads, but you can change to single pages by going to Document>Set Up and deselecting the option for ‘Facing Pages’. If you are using Illustrator or Photoshop, then create your canvas or art-board to be either the single or double page dimensions, including bleed.
2. Add bleed and quiet areas
Add 3mm bleed regardless of size, and allocate a 5mm quiet area along the edges of your design where you don’t include text. This will eliminate the risk of anything important being cut off in the binding process.
If you don’t add bleed to your project, you can be left with an unsightly line of white paper that doesn’t have any ink on it if the cutting blade falls a fraction outside of the trim line.
Once the bleed area has been created in the application the actual content of the page that touches the trim edge must be extended in to the bleed area.
In Photoshop or Illustrator, you will need to calculate the correct margins and quiet areas, as well as increase the canvas size by 5mm to accommodate bleed on all sides. Alternatively, use one of our pre-prepared template files for reference.
When working from InDesign, select “Use Document Bleeds” in the Export PDF dialog box.
3. Set up your margins
If you are creating a single page flyer or staple-bound booklet, then your margins can be the same as your quiet area. However, if you are working on a perfect bound, wire boune, or hardcover book, then you will need to allow for extra space on the inside margains. This is so that, when your books are bound, no important content is lost in the process.
As a rule of thumb, set up your inside margin at a minimum of 12mm for a 30-40 page booklet, and add an extra 1mm for every 10 pages you add on to the page count.
4. Preparing for Output
Before outputting your file, follow our complete checklist to ensure images are the correct size and format and that your page is ready for output. If you want to output as a single page document, you can switch from facing pages to single pages in InDesign, but this may require some reformatting in order to make sure all the elements are in the bleed areas.
When outputting, make sure you select the correct page range, that ‘Spreads’ is not selected, and that you are outputting as a ‘High Quality’ or ‘Press Quality’ PDF with bleed marks turned on.
When working from InDesign, select “Use Document Bleeds” in the Export PDF dialog box.
Double-page spreads are a great way to give impact to your book or brochure, but expanding designs and images across the full width of two pages. It’s ideal for everything from photobooks (where an image might cover both pages) to a magazine (where an image or text can be placed across the entire two-page spread). Here’s our step-by-step guide to setting up your double-page spreads.
1. Set up your file as double pages.
By default, in Adobe InDesign your document will be set up using facing pages. In other words, page one (your cover) will automatically be on the right-hand side, and subsequent pages will be set out side by side in the Pages palette.
If you are creating your pages in Illustrator or Photoshop, you will need to ensure that your canvas or artboard size is the equivalent to double your trim size. For example, if your book is A4, then you will need to create a canvas that is 420mm wide (i.e. 2x210mm).
2. Add bleed and quiet area.
Add 2.5mm bleed regardless of size, and allocate a 5mm quiet area along the edges of your design where you don’t include text. This will eliminate the risk of anything important being cut off in the binding process.
If you don’t add bleed to your project, you can be left with an unsightly line of white paper that doesn’t have any ink on it if the cutting blade falls a fraction outside of the trim line.
Once the bleed area has been created in the application, the actual content of the page that touches the trim edge must be extended into the bleed area.
In Photoshop or Illustrator, you will need to calculate the correct margins and quiet areas, as well as increase the canvas size by 6mm to accommodate bleed on all sides. Alternatively, use one of our pre-prepared template files for reference.
When working from InDesign, select “Use Document Bleeds” in the Export PDF dialog box.
3. Make sure your design works across a spread.
Be sure that all elements line up (where appropriate), and that important elements aren’t lost in the internal margins. Add spaces in words that run across a page to make sure characters don’t get lost in the gutter. With images, try offsetting them.
To offset an image in InDesign, make sure that your image is split into separate frames, on separate pages (not a single frame running across both pages). Move the left-hand image to the left by 2.5mm and the right-hand side image to the right by 2.5mm. Then adjust the frame to fill the pages and bleed correctly. This will create a 5mm area in the middle of the page where the image is duplicated. When printed, this will not be visible, since it will be in the gutter.
With both image offsetting and text formatting, it might not look ideal on your artwork on your computer, but when printed and bound into a larger book, they will look perfect.
4. Exporting files as spreads.
If you are exporting your file as spreads in InDesign, make sure you select ‘Spreads’ in the export panel. When uploading your file to Consort Media for printing, our software will split the pages accordingly.
Please note that although they will appear as single pages in the Artwork Dashboard, the files sent to the printer will maintain their perfect alignment.
Creating your cover file depends on the type of binding you have chosen. If creating a cover for a simple folded leaflet or staple bound booklet, then we use the first page of your multi-page PDF (or the file named Page 1). Our software does the rest automatically.
If you’re creating a case bound or perfect bound book, then separate cover files will be required.
Cover files can be supplied as individual pages (front and back covers) with a separate spine document, or as a single file with integrated spine.
1. Creating a cover file
When creating a cover spread, remember the artwork will wrap around the bound edge, which is always on the left. Therefore, when setting up your artwork, be careful that the front cover of your booklet is on the right-hand side and the back cover on the left.
If creating a new file from scratch, it will need to be twice the trim size, and with space allocated for a spine. For example, if you have an A4 book with a 5mm spine it will be (210mm x 2) +5mm = 425mm wide.
2. Calculating your spine width
Consort Media automatically calculates the spine width when you create a job quote. This is based on the number of pages requested and the weight of the paper chosen. You will find the required spine size in your Artwork Dashboard once you have clicked on the ‘Add to Cart’ option and you can review your final specs.
3. Special features
If you are adding a special feature to the cover, like varnish or spot colour, create a secondary file with the same dimensions as your main cover file, and the special finish areas specified in a single colour.
Uploading your files to Consort Media print ordering system is easy! And there is absolutely no obligation for you to buy the product, even after you’ve uploaded your print-ready files.
Once our price calculator has determined the cost of your project, click ‘Add to Cart’, then ‘Next Step’ to enter our ordering system’s Artwork Dashboard.
On the left you’ll see the following text: ‘Please drag your file(s) here or use the button below to upload your artwork. Please not that page order is rearranged every time a file is uploaded.’ You can drag and drop files from your desktop or upload them from your computer. You can even add them directly from services like DropBox.
Proofing
Our automated proofing system makes checking your artwork easy. But it's up to you to carefully review, check, and confirm that everything is correct before going to print. If you have any questions or concerns, please contact us. We're always happy to help!
Once you have your quote, and you’ve clicked ‘Add to Basket’, you will be taken to the Artwork Dashboard. This is where you upload your files, and the automated proofing begins.
There are three ways to check proofs
1. Preview
Click on the ‘Preview’ button to view the pages in an ebook format.
2. PDF Proof
Click on the ‘Proof’ button to download a PDF proof to your desktop.
3. Thumbnails
Click on the individual thumbnails to view the trim parks, bleed marks, and gutter boundaries.
If our automatic proofing system flags an issue with your files, a warning triangle will be displayed, along with the following text: ‘your files have raised some warnings’.
Click the ‘Show’ button to view a list of the issues found by the system, and on which pages they appear.
There’s no limit to the number of edits you can make to your electronic proof. Keep making changes until you’re satisfied. If you’re new to printing, we recommend giving yourself some extra time to review your files carefully.
Make sure you check:
- Spelling
- Grammar
- Graphic design and style choices
- You can choose to send your project to print without resolving the issues flagged by our system, but if you do, we can’t fix any problems that might arise as a result.
You are responsible for your project’s words and images, and how they’re organized and prepared for production.
Our team of experts can help you resolve certain graphical and layout issues before going to print.
However, we work from the understanding that the content and design you submit is what you wish to use for the final project.
This means we do not check for typos or problems with the content.
To avoid any common issues, please follow our helpful checklist.
Print file set up checklist
We recommend taking the time to do the following when proofing your designs:
- Manual check – Review all issues flagged by our system. Manually check every single page. Our system will catch the vast majority of technical printing issues, but it still isn’t as sharp as the human eye.
Please check that the sequence of your pages is correct and that all required pages are displayed in the previews.
- Images – Our website will warn you if images are under 100 dpi, or if fonts aren’t embedded within your file. We can print your file with low-resolution images. We can’t print your file if fonts aren’t embedded, and would require you to embed the font and resupply the artwork. This can delay the print job, so please double-check.
- Bleed – Click on each individual thumbnail to check the content is within the trim boundary.
You can also check that important information is not within the quiet areas or in the spine gutter boundary (if the item is to be perfect bound). - Text – Make sure all fonts are embedded correctly and that there are no strange text characters appearing in your proof. Also, keep an eye out for missing text, and check that everything is in the right place. Always proofread and spell-check your prints before uploading.
Proper proofing prevents disappointment.
Your designs should be in CMYK colour when uploading. Our system will automatically convert RGB to CMYK, however this can cause some colour variations. It’s best to create your artwork in CMYK from the start.
We cannot guarantee that the colours on your screen will match the colours of the final print product. If colour is critical, get in touch and we’ll do
If our team flags any issues with your print order and bring these to your attention, it will delay the printing process until they’re resolved. We are happy to work closely with you to fix these issues. However, to avoid delays, please check your work carefully before uploading.
Binding
We offer a range of binding options ideal for your next brochure, magazine, or booklet. We offer everything from a simple stapled binding all the way to hardback book binding. You're sure to find something to suit your style and budget in our range of options.
Saddle stitching is one of our most popular binding methods. It is ideal for comic books, short brochures, and other low-page count products. The folded sheets of the booklet or magazine are gathered together, one inside the other, and then attached through the fold line with wire staples. This is why saddle stitched is also known as staple bound.
This is the most affordable type of binding available. However, once your booklet reaches a higher page count, perfect binding is recommended instead.
Get your saddle stitched booklet quote
Important page setup information
| Area | Measurement |
| Bleed | 3mm |
| Quiet Area (binding edge) | 5mm |
| Quiet Area (other edges) | 5mm |
Perfect binding is widely used for soft cover books and magazines over a certain thickness (around 68 pages, depending on the weight of the paper). In perfect binding, the pages and cover are glued together at the spine.
If you choose perfect binding, you have the option of printing a spine. The spine depth is calculated and displayed in the shopping cart. If you don’t choose to upload a print file for the spine, it will be left blank.
Our method of Perfect Binding is known as PUR, which is newer and stronger than standard Perfect Binding. The difference is in the adhesive – Perfect Binding uses Ethylene Vinyl Acetate (EVA), whereas PUR uses Polyurethane Reactive (PUR), which is significantly more resistant to pulling.
Important page setup information
| Area | Measurement |
| Bleed | 3mm |
| Quiet Area (binding edge) | 12mm |
| Quiet Area (other edges) | 5mm |
Wiro binding uses coated metal wires to bind the document together. It’s a popular binding option for both business reports and academic papers.
The fact that the document will lie flat when open makes wiro bound products the ideal choice for instruction manuals or recipe books.
Important page setup information
| Area | Measurement |
| Bleed | 3mm |
| Quiet Area (binding edge) | 20mm |
| Quiet Area (other edges) | 5mm |
This particular binding method is useful if you want to collate and store documents in a ring binder. From training manuals and internal catalogues to quarterly or yearly reports, loop binding makes organising materials smart and simple.
The loops in question are made from wire, which are found on the spine of the booklet. They’re specifically designed to fit into a ring binder or lever arch file, keeping important information tidy and accessible.
Important page setup information
| Area | Measurement |
| Bleed | 3mm |
| Quiet Area (binding edge) | 5mm |
| Quiet Area (other edges) | 5mm |
Hardcover (also known case bound) is the binding method used to create durable books with a higher page count. The cover is non-flexible and supported by a backboard, making it incredibly sturdy.
When ordering a case bound hardcover book, be aware that the artwork setup is different from our other products. Most covers require four pages (front, inside front, back, and inside back). Hardcover books only require two - front and back.
Colour guide for printing
When printing, it can often feel like making the colours do what you want them to do is an impossible task. However, by exploring different aspects of printed colour, and understanding its many quirks, you can fast-forward to getting it right every time.
Our system does accept RGB colour files and automatically converts them to their CMYK equivalents for printing, but the colour conversion is not always perfect.
Any technological device, whether computer monitors, TVs, phones or LCDs, use an RGB colour profile. This is because an RGB profile uses red, green, and blue light to make the different colours – there’s no ink in sight. To reproduce RGB files in print, you have to convert them to a CMYK format. Instead of blending light, this format blends Cyan, Magenta, Yellow and Black ink to make the piece more printer-friendly
The RGB colour model

The CMYK colour model

Unfortunately, RGB can’t be converted to CMYK directly. When switching from light to ink, some RGB colours become impossible to reproduce in CMYK. If a printing company claims they can print in RGB, alarm bells should start going off!
This isn’t to say that RGB to CMYK conversion is impossible. Our conversion guide will step you through the process in a convenient, easy-to-read format. When you successfully convert your RGB files to CMYK before submitting any artwork, you will have full colour control when printing, including manually adjusting tricky colours.
Litho printing has two main ways to produce black: standard black and rich black. Standard black is standard because it only uses black (the K in CMYK). Rich black, on the other hand, uses a mix of Cyan, Magenta, Yellow and blacK to create a richer, more intense colour.
It’s worth noting that, when converting from RGB or greyscale to CMYK, you will automatically end up with rick black.
There are occasions when it is better to use standard black, not rich black. This is particularly important if have very fine lines, like small text or speech bubbles in comics. Even in a full-colour CMYK project, you should always use standard black. Otherwise, you run the considerable risk of ‘ghosting’, where the four ink plates needed to make rich black produce microscopic variations that result in a blurred shadow of unwanted colour.
Standard black (C:0 M:0 Y:0 K:100)

Rich black (C:30 M:30 Y:30 K:100)

Colour can look different on your screen compared to a printed page, because screens are backlit, whereas print reflects colour. Your choice of paper and finish can also affect the appearance of your colours.
For best results, we recommend printing on silk paper, while uncoated paper will produce slightly muted colours.
CMYK always blends four colours of ink (cyan; magenta; yellow; and key, or black), which can produce very slight colour variances between runs, and incredibly small colour variances within different copies on the same run. If colour is critical to your project, please get in touch with our print experts and we’ll give you the guidance you need to get the results you want.
In litho printing, very subtle colour gradients can get lost, especially when ink saturations are very high. When this happens, your artwork could end up looking darker than it appears on the computer screen.
If your ink saturation values are too high overall, the printed result will appear darker than expected. This is especially true with deep blues and blacks. They may look incredible on a backlit screen but will appear much darker in print if your overall saturations begin to exceed 300%.
In the case of single-colour saturations, light ink coverage under 10% may not print at all, while coverage over 90% may turn out as a solid colour.
Do I need an ISBN?
ISBN stands for International Standard Book Number. If you want to sell your book or magazine in shops or online stores, you will need one.
At first glance, it may be tempting to cut the ISBN (International Standard Book Number) from your budget. One ISBN can set you back £89.00, and it’s not needed for any up front sales, direct website sales, or distribution to crowdfunding backers.
However if you want to sell your book in bookshops, Amazon, or other online distributors, libraries, or comic book stores, you’re going to need an ISBN. A unique number is required for every version of your printed material, whether hardcover, softcover, or an updated edition.
Please note that the original buyer is always the owner, meaning a resold ISBN will never be published under your name.
At the end of the day, it all depends on your plans. But if you think you’d like to distribute your product through online stores or in bookshops and newsagents, an ISBN is definitely worth the investment.
Please note, we do not sell ISBNs.
Once you’ve secured an ISBN, you’ll need to create a barcode for it. You can generate a free barcode online.
The barcode can go anywhere on your book, so remember to include it in your cover artwork when you submit your print files. Please ensure that your barcode image is 300 dpi so that it will be clear enough to scan.
Industry standard sizes
Whether you want to print a flyer, a magazine or a hardback book, there are a number of common industry sizes for the many different printed products.
Many of our products conform to standard A sizes, including a range of the most common and popular formats. Check out this quick guide to A sizes.
Does your project call for something a little bit different? No problem! Just contact us to get a quote for a custom-sized product.
Many printed products have very specific size guidelines. For example, magazines are usually A4, standard flyers are A5 or DL, and posters are typically A3 (although they can be printed much larger).
Speciality items like comic books have their own standard sizes.
Here’s a list of some popular printed products and their most common sizes. In addition to these, our instant price calculator offers several other choices. You can also request custom sizing, if necessary.
| Product | Common sizes |
| Magazines | A4, A5 |
| Brochures | A4, A5 |
| Comic books | US Standard |
| Posters | A0, A1, A2, A3 |
| Flyers and leaflets | A5, DL, DL Long |
In addition to the standard sizes described above, paperback and hardback books also have a range of less commonly used sizes. If you don’t know what size your book should be, we recommend choosing a standard A size.
If you have a certain book or booklet size you want to replicate (like a Penguin paperback) and you’re not sure about the dimensions, please read our guide on measuring.
| Size | Width (mm) | Height (mm) |
| A4 | 210 | 297 |
| A5 | 148 | 210 |
| Novel | 127 | 203 |
| Standard | 132 | 197 |
| Demy | 138 | 216 |
| US Royal | 152 | 229 |
| Royal | 156 | 234 |
| Square - 210 | 210 | 210 |
Our guide to folded leaflets
The folded leaflet is the quintessential print product for marketing and promotional materials. Whether you’re printing brochures, programmes, menus or posters, you’ll find a multitude of folding options to choose from. To order folded leaflets click here.
Our unique, intelligent upload system
Our intelligent software allows you to upload your files as single pages or panels, just as you would a book.
So long as the pages are numbered, or supplied in the correct reading order, our smart system - the first of its kind - will automatically place them in the correct position.
And once uploaded, you can also drag the pages to a new position if desired.
Alternatively, you can choose to supply your file with just two pages - Side 1 and Side 2. In this case, you must make sure your content is positioned on the correct panel once folded.
If you’re unsure, please use one of our templates as a guide.
The Consort Media way:
- Unique, intelligent print file upload system
- User-friendly
- Drag and drop pages into place once uploaded
- Downloadable templates available
- Downloadable print file templates
Folded Leaflet 3D Preview
Thanks to our unique system you can view a 3D preview of your finished leaflet, and with a simple click of a button, you can fold and unfold it.
You can even drag and drop the files to change the order, and it’ll all be updated in real-time.
Choose your folding method
Please note
- The size on the price calculator is the final folded size of the paper, not the full unfolded size. This means an A5, 4-sided leaflet starts life as an A4 sheet, before being folded in half. And a DL 6-sided leaflet is an A4 sheet folded twice.
- We crease and then fold paper that’s 170gsm or higher. Although this won’t prevent the paper from cracking outright - if you have heavy ink coverage on a folded area, it’s more likely to crack - it does help quite a bit.
Single-fold or Half-fold
The single fold (or half fold) is probably the most simple folding option available. The paper is folded once along the middle, creating 4 printed panels: a front cover, back cover, and two internal panels.
Downloadable print file templates
Please select the relevant template from the dropdown menu
Letter-fold or Roll-fold (6 panels)
The letter fold (or roll fold) is the ideal choice for displaying a large amount of information in an organised manner. The paper is folded twice to produce 3 sections and 6 printed panels.
Letter-fold is also available* in 8, 10 panels on selected page sizes and paper types.
Downloadable print file templates
Please select the relevant template from the dropdown menu
Double parallel-fold
The double parallel fold is just the leaflet when there’s a lot to say. The paper is first folded in the centre, before being folded a further two times to produce up to 6 sections (can also be 4 sections as the diagram shows here.)
Downloadable print file templates
Please select the relevant template from the dropdown menu
Cross-fold
The cross fold is ideal for larger prints such as posters, maps or infographics. The paper is folded in half and then half again to produce 4 sections and 8 printed panels.
Downloadable print file templates
Please select the relevant template from the dropdown menu
Z-fold (6 panels)
The z-fold (or concertina fold) is the perfect way to split up information into sections in a folded leaflet. The paper is folded twice so that it resembles a z-shape, producing 3 sections and 6 printed panels.
Downloadable print file templates
Please select the relevant template from the dropdown menu
Z-fold is also available* in 8, 10 and 12 panels
The paper is folded in three, four or five times so that it resembles a repeating z-shape , producing 4, 5 or 6 sections and 8, 10 or 12 printed panels accordingly.
* Only on selected page sizes and paper types.
Gate-fold (open - 6 panels)
The gate fold is a very popular folding option. The paper is folded equally from either end so that they meet in the middle without overlapping, therefore resembling a gate.
Downloadable print file templates
Please select the relevant template from the dropdown menu
Gate-fold (closed - 8 panels)
The gate fold is a very popular folding option. The paper is folded equally from either end so that they meet in the middle without overlapping, therefore resembling a gate.
Downloadable print file templates
Please select the relevant template from the dropdown menu
Our paper range
The quality of paper is important for printed products. Printed items are often the first way someone comes into contact with your brand, product, service, or event. It's important to select the right paper type and weight for your design, purpose, and budget.
Silk is our recommended default choice for the very best results. It’s a coated paper with a satin finish and a slight sheet. Silk is suitable for print jobs containing text and pictures, makes printed colours appear bright and well defined, and is great for readability. If in doubt, choose silk.
Gloss is a coated paper with a high shine. Printed colors appear bright and vivid on gloss paper, making it ideal for displaying striking images and photographs in colour.
Unlike gloss or silk, this paper does not have a coating, which gives it a very soft finish. The ink sinks into the paper, giving the colour a more understated appearance. Uncoated paper is a great choice for stationary or postcards, since it’s easy to write on and has a prestigious look and feel.
This is an uncoated paper that has all of the characteristics of uncoated paper, but has not been treated to make it as white as possible. Instead, it has a natural off-white colour. Natural paper is a perfect choice for a more vintage or rustic look.
As the name suggests, this consists of 100% recycled paper. Recycled paper saves trees, and also saves more than 70% of the energy and water used in traditional paper production. It has a natural look but is still very white.
Paper weights
The term ‘gsm’ is an acronym for ‘grams per square meter’. The higher the gsm number, the heavier the paper.
This is a lightweight paper that is good if you’re on a tight budget or are sending your prints through the post (the paper is lighter, so the postage will cost less).
Most magazines are printed in this range. Letterheads tend to be printed around 115gsm.
This is our most popular paper weight range. At 130gsm, you’ll no longer get any show through (where you can see the print from the other side of the page).
This weight range can be used for brochures or magazines, since the paper is strong enough to support the stitching.
Paper in this weight range is thick and has a more premium feel. It’s perfect for covers, certificates, and high-end flyers and leaflets.
Paper in this range can be laminated, but it can only be folded if it’s scored first.
Paper sizes
Our products are displayed in standard A sizes and a range of the most common and popular sizes. If your project calls for something a little bit different, that’s absolutely fine! Contact us and we’ll provide you with a quote for a custom size. Not sure which paper size to choose for your project?
| Size | Width (mm) | Height (mm) |
| A0 | 841 | 1189 |
| A1 | 594 | 841 |
| A2 | 420 | 594 |
| A3 | 297 | 420 |
| A4 | 210 | 297 |
| A5 | 148 | 210 |
| A6 | 105 | 148 |
| A7 | 74 | 105 |
| Size | Width (mm) | Height (mm) |
| DL | 99 | 210 |
| Square - 210 | 210 | 210 |
| Square - 148 | 148 | 148 |
| Square - 120 | 120 | 120 |
| Square - 105 | 105 | 105 |
| Custom size | 105 | 297 |
| Custom size | 210 | 280 |
| Size | Width (mm) | Height (mm) |
| Novel | 127 | 203 |
| Standard | 132 | 197 |
| Demy | 138 | 216 |
| US Royal | 152 | 229 |
| Royal | 156 | 234 |
| Square - 210 | 210 | 210 |
Cover papers add a front and back cover to your booklet. To add a cover, select ‘Add Cover’ in the price calculator and choose your cover paper type, weight, and finish.
The heavier the weight of your cover paper, the more rigid the booklet will be. We don’t advise adding a thick cover to booklets with low page counts, as it forces the booklet to stay open.
Some customers choose a thinner cover to give their booklet more flexibility, while others choose not to have a cover at all. This is often called a ‘self-cover’ or ‘floppy cover’, since with this option, the booklet is very flexible.
Note: only cover papers can be laminated.
We offer a wide range of paper weights, but not all options are suitable for every product. But don’t worry–our cost calculator is very advanced, and it won’t let you choose an unsuitable option.
Your available suitable options may also change depending on whether your order is going to be printed on a digital or litho press. Our system always makes sure that your options fit the printer being used for your order.
Some products, like letterhead stationary, are made with uncoated paper, so you can print on the paper with your desktop printer. Digital uncoated paper can’t be overprinted on with a desktop printer. That’s why all of our letterheads are printed using a litho press.
On occasion, when it comes time to print an order, we might find the particular requested paper weight out of stock. Rather than delay your order, we will often print it on the next weight up.
This is called ‘upgrading’ and is quite common in the industry.
Most of the time it is not an issue, but if your item is going to be sent by post, upgrading the paper can affect the postage cost.
If paper weight is of great importance to your order, please let us know before we go to print.
We do not charge extra if we need to upgrade your paper, and we never downgrade paper.
Paper is a natural product, supplied from the mill in batches. As such, there can be variations in weight or thickness from one batch to another. This can result in paper that is up to 10gsm heavier or lighter.
We may also buy our paper from different merchants at different times, which can also lead to small variations in our paper stock.
We’re passionate about the environment here at Consort Media, and we do our best to source materials that have a minimal environmental impact.
We’re also working hard to make sure that we leave the lightest possible carbon footprint in everything we do.
For example:
- We print on environmentally certified and recycled papers
- All our papers are from sustainable sources
- We use superior-quality vegetable-based inks
- We recycle all our waste products
Our process
Are you wondering what it's like to print with Consort Media? Follow our step-by-step guide to find out.
Our unique price calculator lets you get an accurate price instantly. No waiting for quotes when you use Consort Media's printing service! Simply enter your order specifications–choose from a range of formats, paper types, bindings and finishes–and watch as the cost and delivery date update instantly.
Our price calculator can help you save money, too. Play around with the different options in any order, and see how the choices affect cost and delivery time. The calculator can even suggest alternative specifications and turnaround times. Consort Media's unique instant price calculator is the perfect tool for helping you find the best price for your printing.
You are never under any obligation to pay until you are ready to print.
Uploading your print file to Consort Media is easy!
Select ‘Upload’ or simply drag and drop your files into the Artwork area. You can even select multiple files at a time.
You can also add a file directly from Dropbox, or paste a URL from WeTransfer or similar services using the ‘Choose from Web’ option.
We recommend supplying files in PDF format; however, we can accept many other formats, including JPG and PNG. We do not recommend JPG and PNG formats for text. All files will be converted to CMYK for printing, which can alter the colour.
If you’re printing a booklet, our system allows you to shuffle the pages and insert additional blank pages. No other online printer lets you do that!
To proof your file, click on a thumbnail to enlarge any page for closer inspection, and to see any highlighted warning areas. Our advanced online proofing system helps to highlight any issues with your text, bleed, layout, and image resolution.
You can click ‘Proof’ to generate a downloadable flat PDF proof of your print job.
Some of our product proofs are displayed in 3D, so you can see how they will fold, or how the pages will turn. If you’re printing a booklet or other multi-page document, you’ll even get an online flipbook to browse!
You can share your design (even before ordering!) with colleagues or clients for that final seal of approval. Select ‘Share’ and choose from a number of popular social media platforms, send via email, or generate a URL or embed code.
When you are ready to pay and print, you must tick the box to confirm that you have checked the proofs and everything is correct.
Once the production process begins, no further changes can be made to your order.
That’s it! Your print job is in safe hands. Kick back, relax, and let Consort Media do the thing we do so well. Our print experts will take care of your order, and you’ll soon find out why we’re rated Excellent by so many of our customers on TrustPilot.
We will send you a confirmation of your order by email. You’ll get another email when your order is dispatched.
If you have any questions during any part of the process, you can talk to our print experts using the Messages tab in the dashboard of your order.
We typically use DPD to deliver our products in the UK. You’ll enjoy all the benefits of this award-winning courier service, including SMS notifications, easy parcel tracking, and a one-hour delivery window.
We also offer split deliveries and international shipping on request.
Our print finishes
Consort Media offers a wide range of finishes. Learn about the different finishes and find the perfect final touch to your next print project on this page. From matt, gloss and soft touch lamination, to spot UV and UV varnish, we offer a quality and consistent finish across all product types.
Lamination adds a plastic coating to the finished product. It’s a durable finish, offering protection from cracking and scuffing, and prolongs the life of the item.
Lamination also looks and feels great. Ideal for hardcover books and catalogues, lamination prevents paper from tearing, folds from cracking, and ink from transferring or rubbing onto fingers.
Lamination can elevate the quality and durability of a finished print project, but it can also alter the final colour of a product ever so slightly.
Lamination is highly recommended for ink-heavy projects.
Matt lamination is our most commonly used finish, and is recommended for use with silk paper. If you’re ever in doubt as to which finish to use with a cover or staple bound booklet, choose silk paper with a matt lamination.
Unlike its gloss counterpart, matt is muted and offers a classy, understated finish. It’s also a good option for flyers, posters, and business cards to prevent scuffs and scratches.
Gloss - which, as the name suggests, offers a high gloss finish - is recommended for gloss paper to further enhance the brightness of colours and intensity of shine.
Typically used for ‘glossy magazines’, which tend to be perfect bound with silk paper pages, a gloss cover with gloss lamination offers a super shiny, high contrast, premium finish. It’s the perfect combination for your next magazine or brochure.
A lush matt finish, soft touch lamination is (unsurprisingly) soft to the touch. It’s a great option for business cards, as the pleasant, tactile sensation often catches people by surprise and makes quite an impression.
Soft touch isn’t as commonly used as our other laminations. However, with an almost moleskin leather-like feel, it can add a premium look to hardback and paperback books and other products.
UV Varnish is an ink applied to paper stock to give the page a smooth finish. It offers less protection than lamination, but it does seal the printed material, helping to preserve and protect it.
Usually a varnish is applied from edge to edge, and is a good alternative to laminate.
We offer two options for UV varnish:
- UV Gloss: a high gloss finish, visually similar to gloss laminate
- UV Matt: dulls the colour, but it’s not as noticeable as matt laminate
Spot UV - also known as Gloss UV - is a high gloss finish applied to specific areas of a print product. The result is creates captivating contrast, making it the perfect choice for premium business cards and luxury brochures.
For the very best results, we recommend selecting a matt laminate, then a Spot UV finish to draw attention to a particular area of your design. Visually striking, it’s a terrific option for highlighting a brand name or a logo, or to help make a design feature more prominent.
3D UV is a similar finish to the Spot UV; the only difference is that the ink is thicker. This raises it from the surface, which adds prominence and texture. This is ideal for a unique, high-end look and feel.
There are a number of reasons why you might not want any type of finish on your print project, both practical and artistic.
If you intend for your product to be recyclable, don’t apply a laminate finish. Paper is shredded when recycled, and the plastic coating from lamination can be a contaminant.
Using an uncoated paper can help you achieve a rustic, artistic, eco-friendly look. The paper retains an earthy, natural texture if left unfinished. Please be aware that it will be more susceptible to rubbing, tearing, and marking.
We don’t offer lamination for uncoated, natural, or recycled papers.
This is because uncoated papers absorb a lot of ink, so they aren’t a good candidate for laminate coatings. If the laminate is applied over an uncoated paper that doesn’t have enough ink coverage, it will start to peel off.
If you’re choosing uncoated, natural, or recycled paper, you probably appreciate the more natural appearance and feel of it. Any type of lamination would negate the aesthetic effects of those paper choices.
Quotes
Use our instant price calculator to get quotes for printing costs and explore our shipping options.
Our sophisticated price calculator generates a quote instantly. Just enter your order specifications (choosing from a range of formats, paper types, bindings, and finishes), and watch as the options and overall cost update immediately.
Our calculator can even suggest alternative specifications and turnaround times, helping you save money every step of the way.
Delivery costs vary depending on the size of your order and its destination. These costs are included in the calculations made by the instant price calculator.
You’ll find different delivery options in your shopping cart. The least expensive option is selected by default, but you can choose from faster options for an additional cost.
If your print job needs a bespoke size or page count, we can help. Select the ‘Custom Size’ option on our instant price calculator, or contact one of our print experts. We can offer more sizes and options than are shown for most of our products – just ask!
For a custom quote, please email consort@consortmedia.co.uk
If you need to send part of your print order to an additional location (or locations), we can make this happen with split shipping. You can ship to as many addresses as you like (for example, as part of a direct mail campaign).
Our split shipping service is only available for substantial litho print orders, and is not available for digital print orders.
The cost of split shipping can vary depending on the size of the order and how it’s packaged.
To organise split shipping, please email consort@consortmedia.co.uk
If you’re shipping internationally, we can work with you to find a logistical solution that meets your needs and budget. Split shipping can also be arranged for international orders.
Our prices may change at any time, for a number of reasons including increasing labour costs, increased material costs, and changes to shipping rates from our third-party provider.
But once an order has been agreed upon, the price will not change. All quotes are valid for two weeks (with the exception of our express service, which is valid only at the time of order/confirmation).
Timed estimates can change up to the point when they are confirmed.
Shipping and delivery
We've streamlined our shipping process to make your print delivery as quick and easy as possible. Whether you're shipping within the UK or overseas, we take care of all the paperwork.
Delivery costs vary depending on the size of your order and its destination.
You’ll find different delivery options in your Shopping Cart. While the cheapest option is selected by default, you can choose from faster options for an additional cost.
When you use our instant price calculator, an estimated delivery date will be shown. This is usually 2 to 4 days for smaller orders, and 4 to 6 days for larger ones. The bigger the order and the farther it has to travel, the longer it will take to be delivered.
Please note, our delivery dates are estimated. If your order is time sensitive, please contact us in advance to discuss your deadline.
Delivery dates are estimated on the assumption that your order will immediately go into production. If your order is confirmed 3 days later, this will add at least 3 days to the estimated delivery date.
Sometimes when we’re really busy, orders can take it a bit longer. But we’ll always let you know if that’s the case.
If your order hasn’t arrived yet, please contact us in one of the following ways and we can assist you:
We usually use DPD to deliver our products in the UK. You’ll enjoy all the benefits of using this award winning courier service, including SMS notifications, easy parcel tracking, and a one hour delivery window.
Smaller orders are sent in boxes or small parcels and are usually trackable. Larger orders are delivered on a pallet for a kerbside delivery but aren’t trackable.
Need to ship part of your order to one location and the rest to another? Not a problem!
Simply set up your order as normal, add the first address, then contact our team via the Messages tab in your order dashboard with the quantity you would like shipped to a second (or third, or fourth) location. We will then calculate the split shipping cost for you and add it to your order.
Please do this before paying for and confirming your order.
Split shipping can be combined with international shipping.
We will ship to anywhere in the UK, US and Europe.
If the country you would like to ship to is not available on our website, please contact our team with the details of your order and ask for a shipping quote.
If you need international split shipping, we can take care of that too!
Consort Media has relationships with a number of reputable fulfilment companies, some of which are very close to where your orders are printed. This means that we can print, pack and ship directly to your customers in large quantities very quickly.
Carbon Balancing
Our print buying platform continuously monitors and calculates the carbon emission s associated with the production and delivery of every print job placed through it.
Using a sophisticated algorithm, the system evaluates:
• The specific manufacturing methods each print job will use.
• The energy consumption (measured in kilowatt hours) of the machinery required to complete the job.
• The CO₂ ratings provided by paper manufacturers and merchants for their product ranges.
• The CO₂ emissions generated from the delivery of the finished job.
Once the total carbon footprint is calculated, we purchase and retire the equivalent number of carbon credits through a Climate Impact Partner.
This means that every print order placed through our print hub is automatically carbon balanced, at no extra effort for our customers. For each purchase, we offset the greenhouse gas emissions on your behalf by supporting global projects that deliver both environmental and sustainable development benefits.
Our Commitment
We care deeply about the planet, and our goal is to move toward a more sustainable, greener future.
More info about our current Climate Impact Partner can be found at www.carbonneutralbritain.org
Video Tutorials
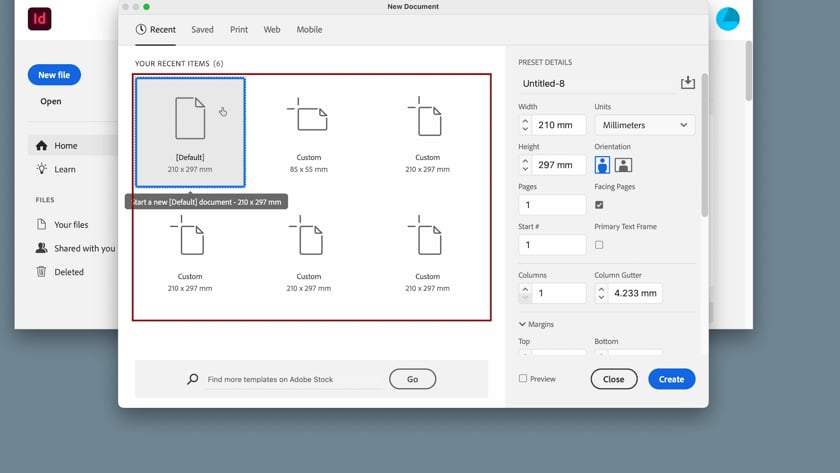
1. Setting up a standard A4 page with margins and bleed in InDesign
2. Setting up a customised size, such as a standard business card with margins and bleed in InDesign

3. Using CMYK For Print using InDesign
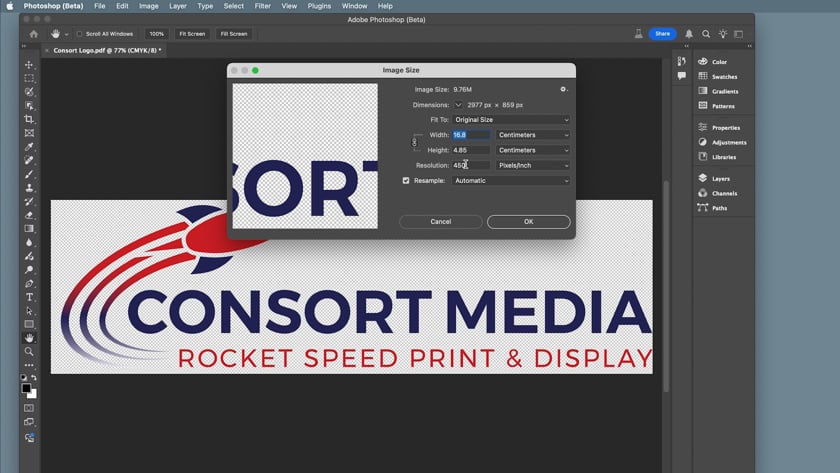
4. Ensuring a Photoshop logo is in CMYK, ready for print